Wednesday, December 18, 2013

Making a Tree

I wanted to show you how to make a tree from a half circle.  I used my Circle Cutter (http://www.justimaginecrafts.com/catalog/product_info.php?cPath=24_56&products_id=285 )  to make a 5 inch circle and cut it in half so I can make 2 cards.

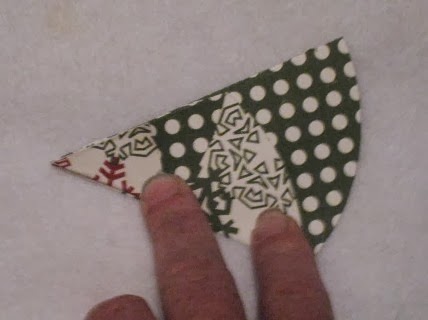
Next I used my Scor Pal to measure and draw a straight line at 1 1/4" and I folded it so the back side is on top.  Next step take  small top piece that is the back of your paper and make a triangle.  Last bring the front paper around.


  This is what the tree should look like.
So the white paper was my top and you see the small triangle, next is the green & white polka dot,which is the back, next he white (top) and last polka dot (back).  So you have 3 folds.  I kept them down with brads, after punching a hole in the tree where I wanted the brad to go (looks like ornaments).

This is what the card looks like and I will tell you how I assembled it.


I took the Christmas Tree and centered it on embossed piece of cardstock.  I added a brown trunk and made 2 holes to add some twine and tied a bow.I also added a blingy star at the top with the sentiment Merry Christmas.  I mounted it on 2 separate Christmas line papers, then put on my base.  I think this was my favorite Christmas Card I made this season.  I know I could not have made the circle without the Circle Cutter, since punches are not that big.

I hope you enjoyed this card as much as I did. 


Photobucket Photobucket

Monday, December 16, 2013

Icy Hot Challenge at Cards in Envy


New challenge happening at Cards in Envy (http://www.cardsinenvy.blogspot.com/2013/12/icy-or-hot-card-challenge.html)
This challenge Will be from December 16th through January 5th.
This time we challenge you to make a CARD (A2 size only 4.25"x5.5") that is either ICY cold (winter, snowy, icy) OR a CARD that is HOT (summer, devilish, steamy). It's your choice!


Just a reminder that it's important that you follow our challenge rules. We are a CARD challenge only. All cards must be flat enough to fit in an envelope for mailing and must be the A2 size--NO SQUARE CARDS.

Here is my card:


I used some scraps from an older collection from Imaginisce that I won.  I used the sentiment that was a rub on with the set and the cup is a sticker.  I think this melded both the hot and the cold.

Have fun and hope to see you come play with us.
Photobucket Photobucket

Challenge 20 is a Sketch


Come on over to Love to Scrap! Challenge Blog (http://lovetoscrapchallengeblog.blogspot.com/)
to play Challenge #20 which is a sketch.


and my take on it is the following card:


I am using the digi Merry Christmas from our sponsor, Eureka Stamps, who is giving away 5 images to the winner.
Now I will tell you about my card.  I used the digi and change the font color to red to go with the card.  I used Bo Bunny's last year Christmas release, some Christms Trendy Twine, some bling and red cardstock.  This went together quickly due to the sketch.

Hope you come over and play with us, this challenge will run December 16 through the 29th. So technically this is our last challenge for the year.  Have fun playing.
Photobucket Photobucket

Wednesday, December 11, 2013

Merry Christmas with Holly

I have another Christmas Card to share with you using Kreaxions Holly Punch #914 and my favorite Circle Punch.  I also using more scraps from the Bo Bunny line from last year.

Here is my card:


In the corners I used The Holly punch #914 with Insert C, which does both the corner and the Holly.

As shown in this picture: 


For the rest of the card I cut out a circle using the Circle Cutter and made a 2 3/4 inch circle.  I added some Bling and a sentiment from Stampin'Up.  I also put Stickles on the place where I punched out the Holly Berries.

These are the items I used:
Circle Cutter  http://www.justimaginecrafts.com/catalog/product_info.php?cPath=24_56&products_id=285


and the Holly Punch #914 http://www.justimaginecrafts.com/catalog/product_info.php?cPath=26_50&products_id=211


Hope you enjoy making these.

Photobucket Photobucket

Wednesday, December 4, 2013

'tis the Season


I am loving the variety I can make using the circle cutter and my Holly Punch #914.  Let me tell you how I  used them.


For this card I cut out the smallest circle a circle cutter could do to make some ornaments for my Christmas Tree and placed them scattered on the tree and put Candi on each circle to highlight them as ornaments.  The tree is a triangle that fits on the front of the card and has a Tim Holtz star on the top.  I made a trunk in a really dark green.  Below the tree I made a peek-a-boo area that I cut out the holly (with punch #914), then put some green paper behind to fill the leaves and then I use Stickles to make the berries. Below the holly I used the border to add to the card.  Last I put a K & Company sticker that has 'tis the season.  The paper I used is the last year's Christmas paper from Bo Bunny.


The items used for this card are:
Kreaxions Holly Punch #914  --   http://www.justimaginecrafts.com/catalog/product_info.php?cPath=26_50&products_id=211
Circle Cutter  --  http://www.justimaginecrafts.com/catalog/product_info.php?products_id=285

PhotobucketPhotobucket

Monday, December 2, 2013

Tag!!! You're it at Cards in Envy

Today starts a new challenge over at Cards in Envy -- http://www.cardsinenvy.blogspot.com/2013/12/tag-youre-it-challenge.html
The card is stll an A2, not just a tag or one you might use on a gift.  It also must be flat so it fits into a first class envelope with no extra postage.
Here is my card: 

I knew I had a tag left over from a kit and this page was from Crate Paper, so I cut out the birthday tag, found some scraps from some Taylored Expression kits, I used to get.  I pulled out some really light pink cardstock, some crinkle ribbon to match the tag, punched a flower and found the flattestbutton ever.  I did not pull the ribbon thru the tag hole, I stapled it into a "V" that lays flat in the card.

I can't wait to see what you do on the site.
Photobucket Photobucket

Love to Scrap Shape Card Challege


Love to Scrap!!! http://lovetoscrapchallengeblog.blogspot.com/
has a new challenge up and it is a shape, but anything but a square or rectangle.  It can be a card or project.
This challenge runs December 2-15 and is Sponsored by Lacy Sunshine Stamps (Prize is 5 images of choice to winner) .

Here is the card I did using:  Holly Flower Pot Pretties Precolored Digi.  I did embellish it a bit using some Stickles.

I used my circle cutter from Kreaxions to make the large circle card an the circle with the digi and the backing circle.  I used some scraps from last years Bo Bunny Christmas line with some ribbon.  My sentiment is from SRM.

I am also entering this card in:
Joanne Sheen Challenge (http://joannasheenchallenge.blogspot.ca/) -- sparkle
One Stitch at a Time Challenge (http://onestitchatatimechallenge.blogspot.com/) -- use a digi
Robyn's Fetish (http://robynsfetishchallengeblog.blogspot.com/)  -- Christms Card
The Ribbon Girl (http://ribbongirls.blogspot.com/)  -- christmas
Pumpkin Spice  (http://pumpkinspiceblog.blogspot.co.uk/) -- scraps

Photobucket Photobucket

Wednesday, November 27, 2013

3D Ornament Card

Hi Everyone,

I love the holiday's and especially the ornaments at Christmas time.  I thought I could add an ornament I saw to make it 3D, so here goes my try.  It was easy and I loved the look.  You can also fold down the ornaments on the front of the card to mail them.

Here is what it looks like: 
I will tell you how I did it.  First I used the fabulous circle cutter and set it on 1" and that will make a 2" circle.  I got 4 different kinds of Christmas paper that went together (mine happened to be scraps).  Then I cut 1 out of some cardstock scrap for the base that will not be seen.  The 4 different circles I folded in half, the side you like is in the middle.  Next I glued 2 halves together, from the sides I did not want to use and did that with each of the 4 circles.


Then I glued them to the cardstock so they become a 3D ornament.
I made 2 of those and placed them on the card at different levels.  I used some Trendy Twine to make a straight line to the top of the card.  Placed the ornament and put a bow on top.
Last I added some sentiment from SRM stickers.


This is the Circle Cutter I used from Kreaxions and here is the link:
http://www.justimaginecrafts.com/catalog/product_info.php?cPath=24_56&products_id=285
Photobucket Photobucket

Wednesday, November 20, 2013

Merry Christmas with Christmas Ornaments

I am making a Christmas Card today for the Just Imagine Crafts.com (http://www.justimaginecrafts.com/catalog/).  I went clean and simple with this one, using some scraps to make it easy.   also used my FAVORITE Circle Cutter, that I can't get enough of.


That is the card I came up with.

As I mentioned above I used the Circle Cutter and cut out circles measuring 1 1/2", 1", and 1/2".  I used to hate to cut circles and now I think up reasons to use my Circle Cutter.  I took a piece of red cardstock that was 1/4" on both top and bottom shorter than the base of the card.  Next I cut outthe circles in the 3 sizes and placd them different heights on the card.  Next, I had a rule and used faux stitching, whichif you had a sewing machine you could use that.  I made the line from the midde of the ornament to the top and then around the ornament.  I made a littl bow with some white twine and stuck it down with Glossy Accents.  I flipped over the red and put some scraps of paper and adhered them so you culd see them through the circles.  Last I added SRM Sentiment. 


This is the fabulous Circle Cutter.
http://www.justimaginecrafts.com/catalog/product_info.php?cPath=24_56&products_id=285
I hope you enjoy makig this card, let me know what you think.

Photobucket Photobucket

Monday, November 18, 2013

Punch it over at Cards in Envy


New challenge over at Cards in Envy  http://www.cardsinenvy.blogspot.com/2013/11/punch-it-challenge.html
It starts today, November 18 and goes through December 1.  You can pull out your punches and use them on this card, just remember not to make it bulky so it only costs 1 stamp.  It has to be an A2 size.

I jumped holidays since I got some new paper and a new punch from Kreaxions -- the heart punch so it made sense to do a Valentine Card.


This is the new line from My Minds Eye, some Trendy Twine and the Kreaxions punch #917.  Just a fun card to do in the Middle of the Fall and Winter holidays.

Photobucket Photobucket

All Aboard for new challenge at Love to Scrap


Today starts a new challenge at Love to Scrap and it is Boys Rule so must be masculine.  Since I have 2 MEN that is easy for me.  I saw this digi Train from our sponsor and knew I could masculine it up.

Here is my card: 
So I made a card that is 5 1/2 X 5 1/2.  I made a Polaroid frame and wrapped i with some black twine from Trendy Twine, next I put my digital image in the frame.  Notice I did not color it all the way.  I used my distress pads from Tim Holtz and the watercolor brush and just highlighted certain parts, to make it stand out.  I stamped and cut out the Railroad Crossing sign from Stampers Anonymous, added some red cardstock behind the frame and distressed it and turned it at an angle.  I added a strip of red cardstock and used the small Tim Holtz Letters and you have my card.

Now the challenge runs today (November 18) through December 1st.
Sponsored by QKR Stampede (Prize is 5 images of choice to winner)


I hope to see you step up to the plate and take the challenge.

Photobucket Photobucket

Wednesday, November 13, 2013

Holly Tags


I know that Christmas is coming and I need to make some cards and tags, so today I did a couple of tags to get them done.


What I did was cut out a card that is 3" tall and 6" wide.  I folded it in half and used Kreaxions punch #914 o the top and bottom corners.  I used insert "C", I found it easier to do 1 layer at a time.


And the white cardstock center of the card I used a new Tim Holtz Stencil called Holly Bough.  I added it to the card so I did not cover the holly edges.  On the top I punched a hole a used Trendy Twine and left it long to attach to the gift after I wrapped it.  The sentiment I used is from Stampers Anonymus.  I need to make a few more, but I am trying to make them all different. 

This is the punch I used:  Kreaxions Punch #914 that is Holly


http://www.justimaginecrafts.com/catalog/product_info.php?cPath=26_50&products_id=211

Photobucket Photobucket

LinkWithin

Related Posts Plugin for WordPress, Blogger...